Widget Widget
Widget nhúng cho người dùng cuối: xem điểm, tier, achievements, đổi thưởng. Floating icon + modal, có thể nhúng vào website của bạn.
Giá trị cho đối tác (use case)
User của bạn thấy điểm, hạng, nhiệm vụ và đổi quà ngay trên website/app — chỉ cần một icon góc màn hình, click là mở modal đầy đủ. Bạn không cần thiết kế hay build UI từ đầu; chỉ nhúng vài dòng code là có trải nghiệm gamification hoàn chỉnh. Phù hợp khi bạn muốn end-user tự xem điểm và đổi thưởng mà không cần sang trang khác.
Tích hợp từng bước (cho Developer)
- Có apiBaseUrl và apiKey
Lấy từ Client Admin → API Keys (hoặc từ backend của bạn trả về theo session). API Key không nên hardcode trên frontend.
- Thêm thẻ div và load script từ CDN
Trong trang (sau khi user đăng nhập): thêm
<div id="gamify-widget-root"></div>. Load React 18 +gamify-widget.umd.jsvàgamify-widget.csstừ CDN (link bên dưới). - Gọi GamifyWidget.mount(...)
Truyền
apiBaseUrl,apiKey,externalId(id user trên hệ thống của bạn),container: '#gamify-widget-root'. Widget tự gọi Identify để tạo/lấy user — không cần gọi API trước. Xong, user thấy điểm và đổi thưởng.
Hai chế độ:
- API Key: Truyền
apiBaseUrl,apiKey,externalId(hoặcuserId). Widget gọi API với Bearer + X-User-Id. Khuyến nghị lấy apiKey từ backend/session. - Token (Verify URL): Truyền
tenantSlug+getUserToken(). Widget gửi header X-User-Token; backend Engine gọi URL verify của tenant để lấy external_id.
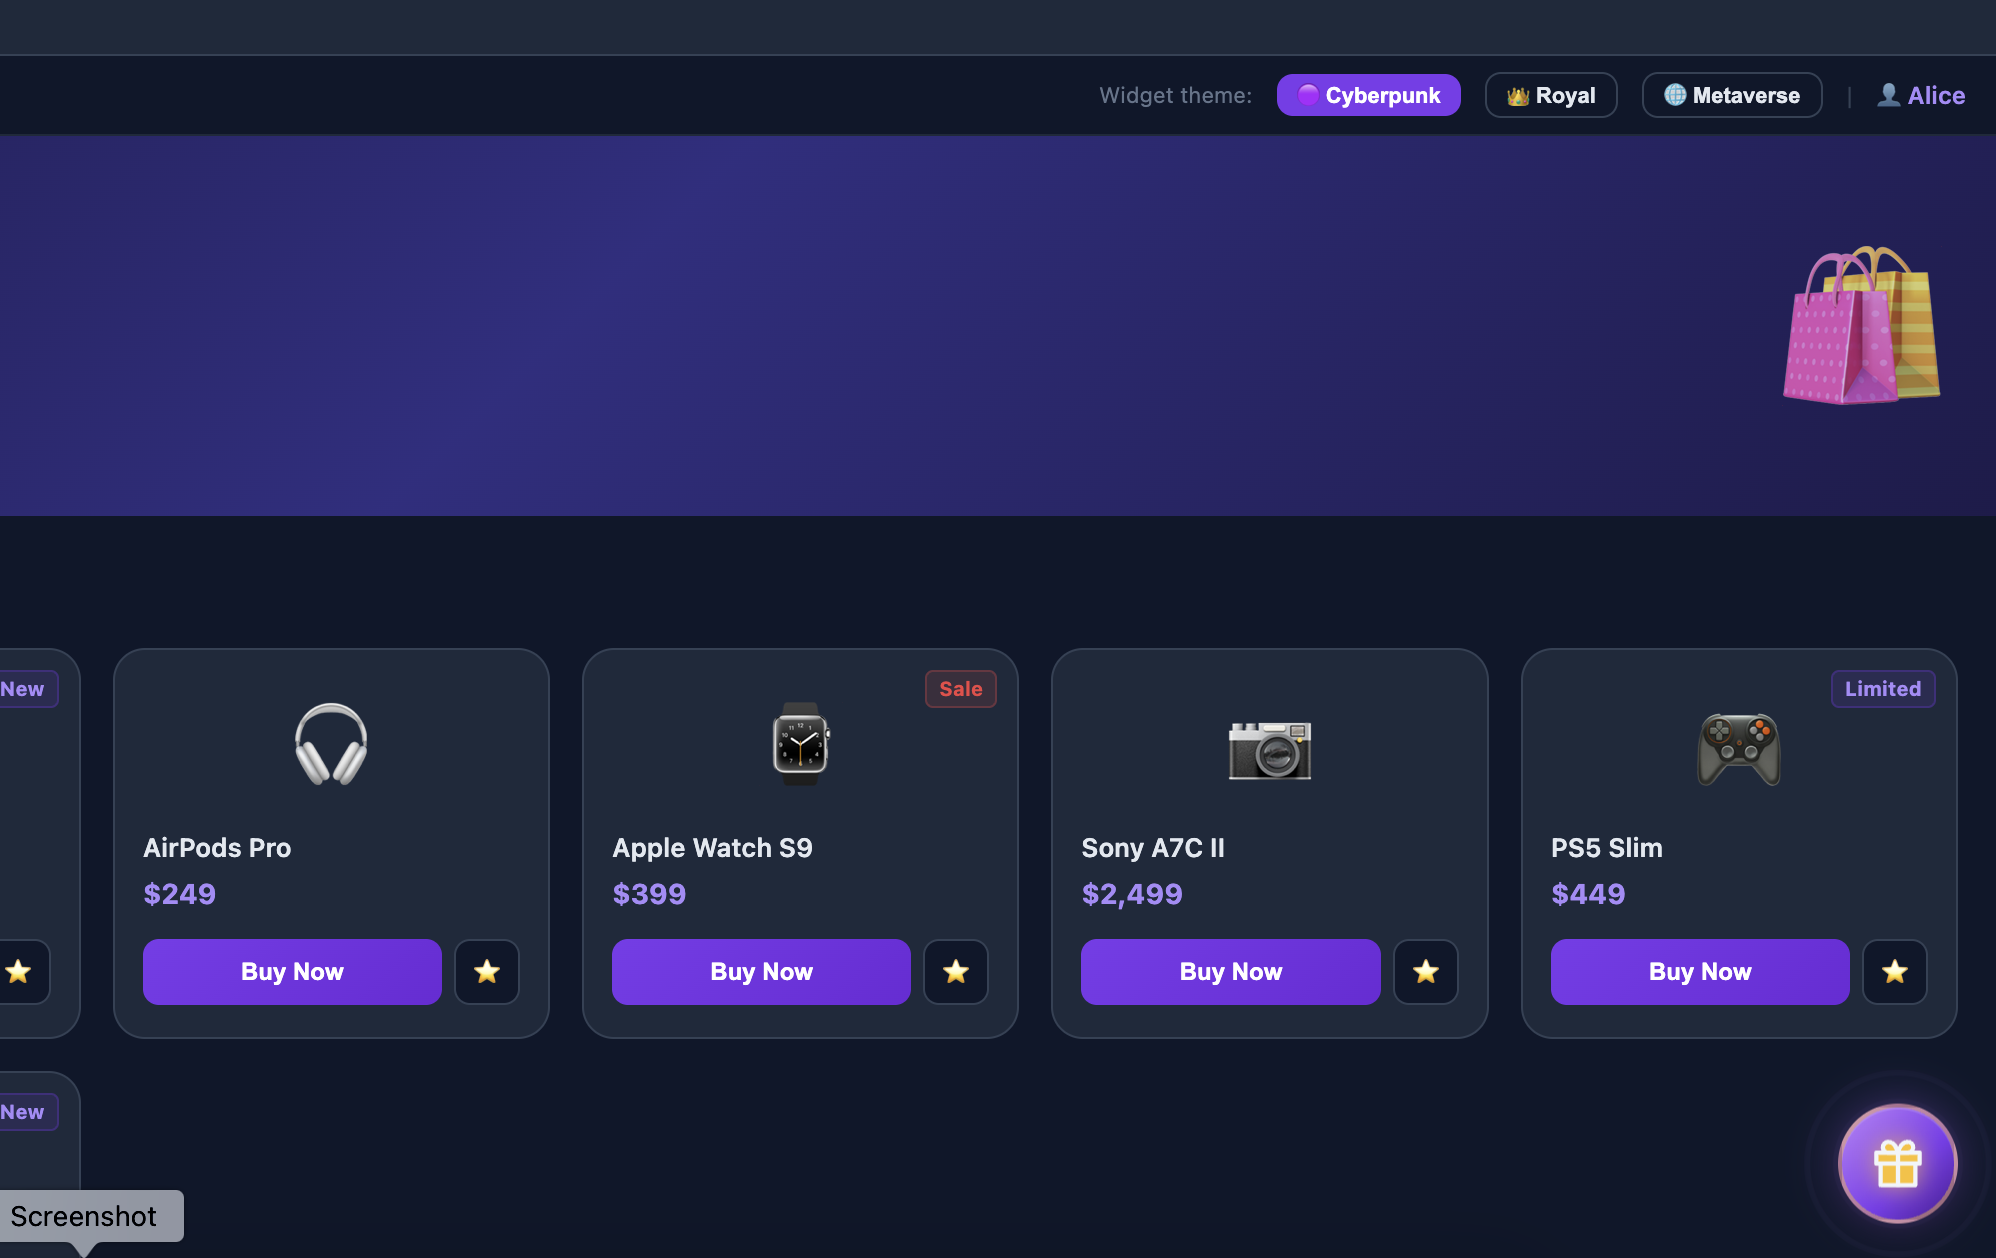
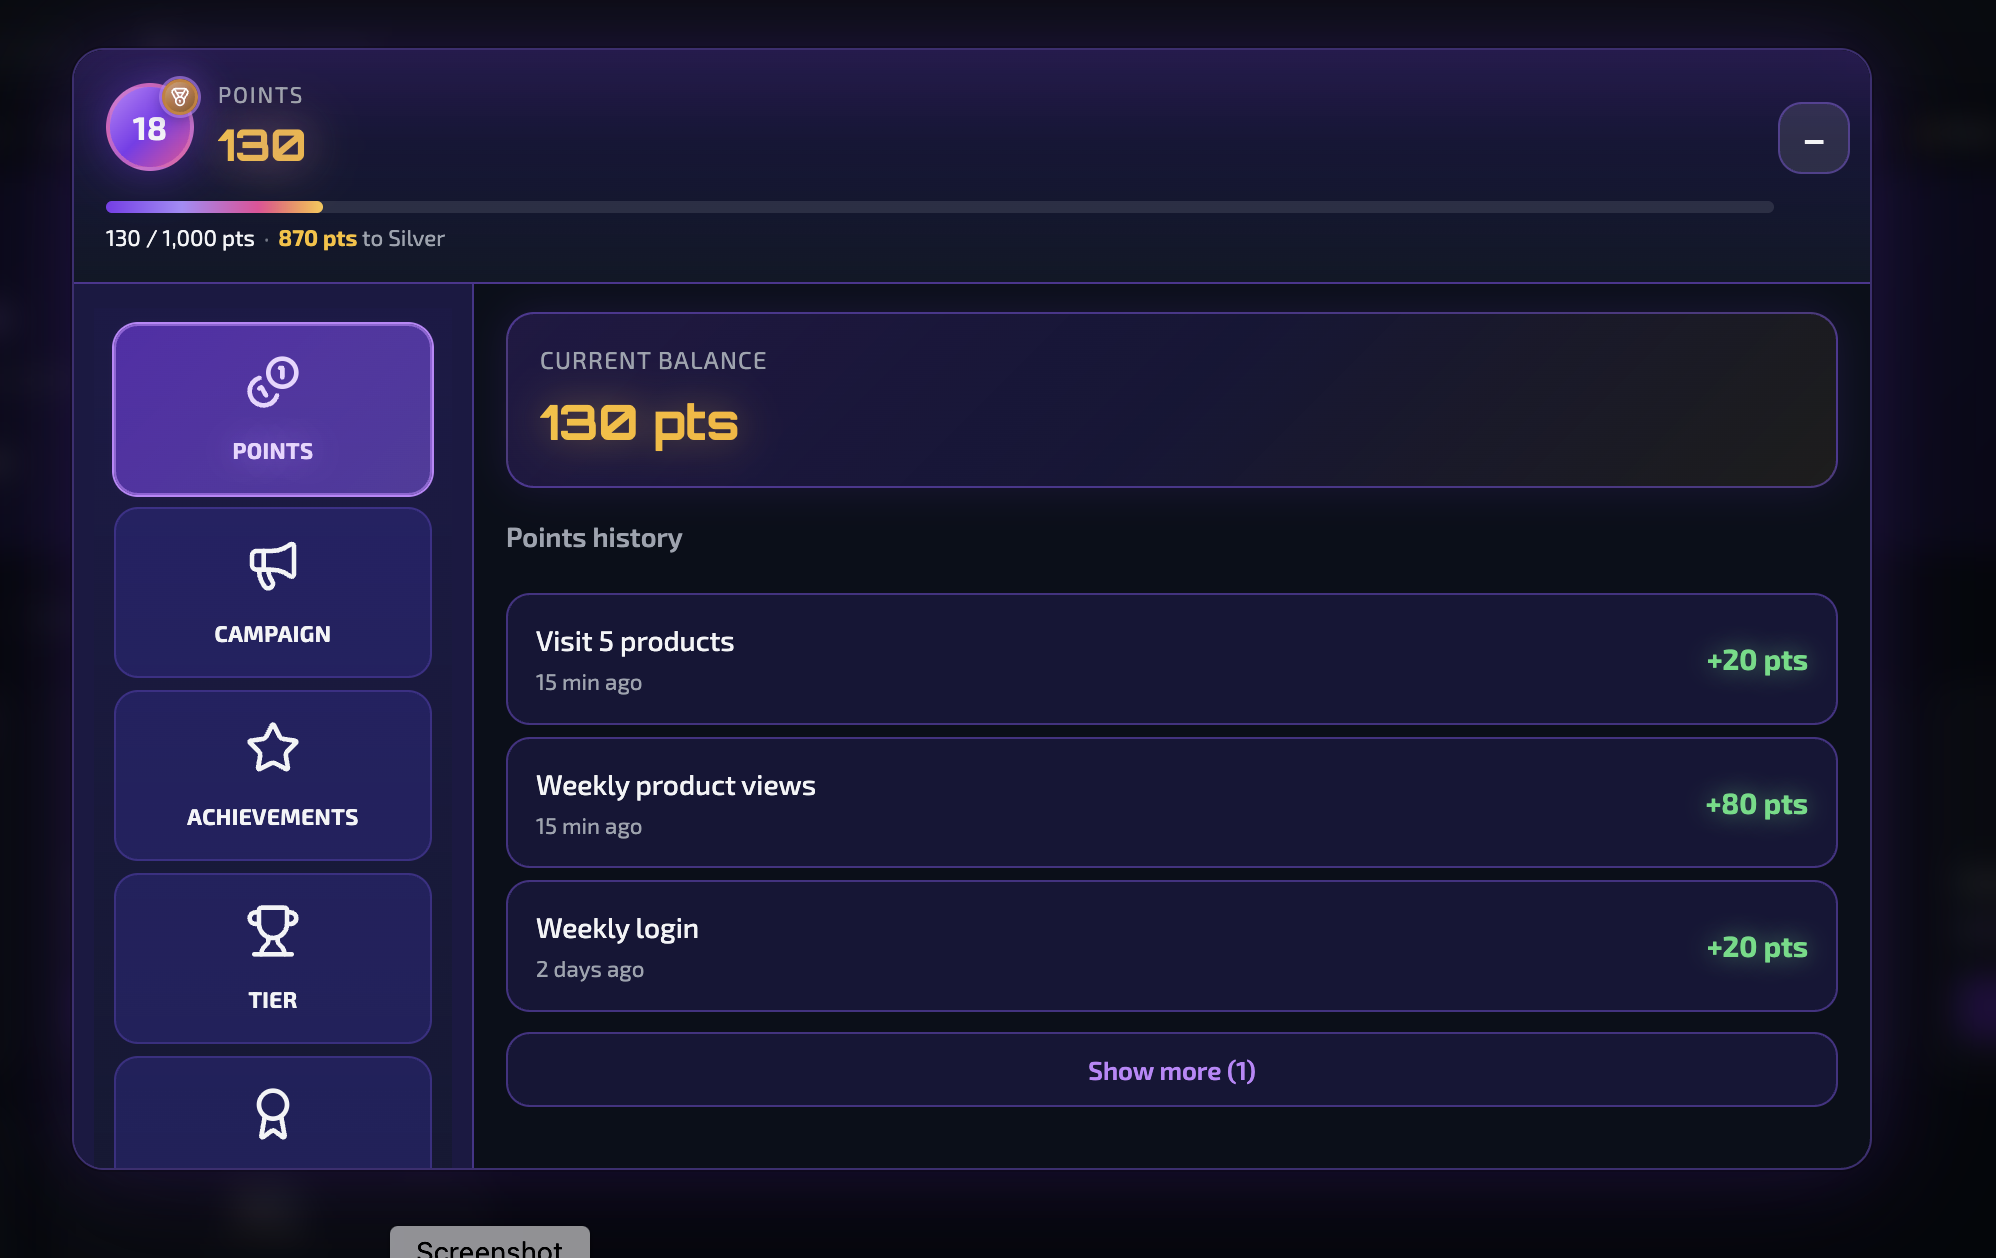
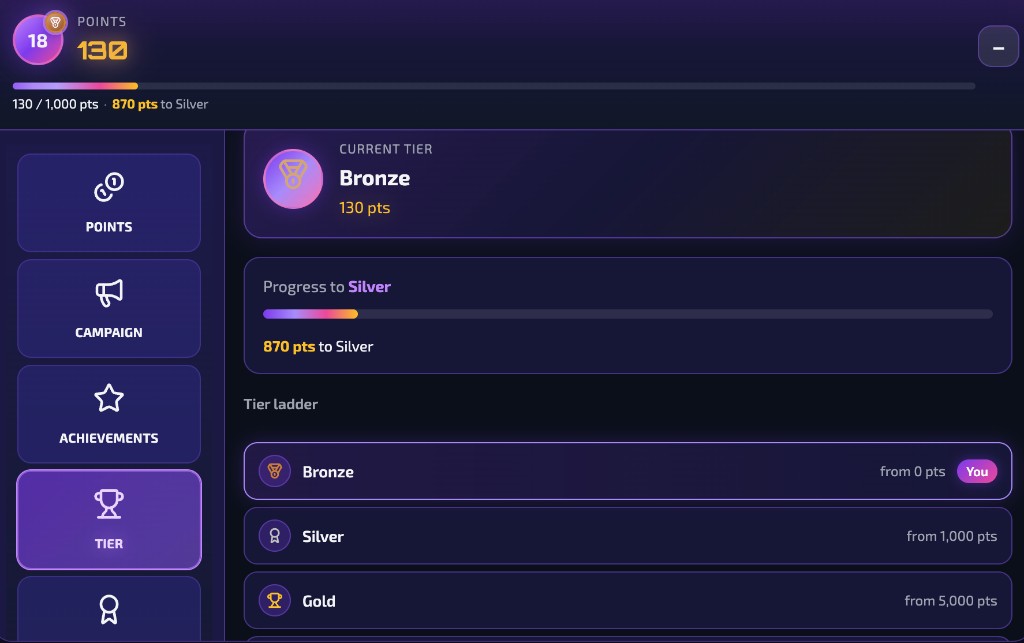
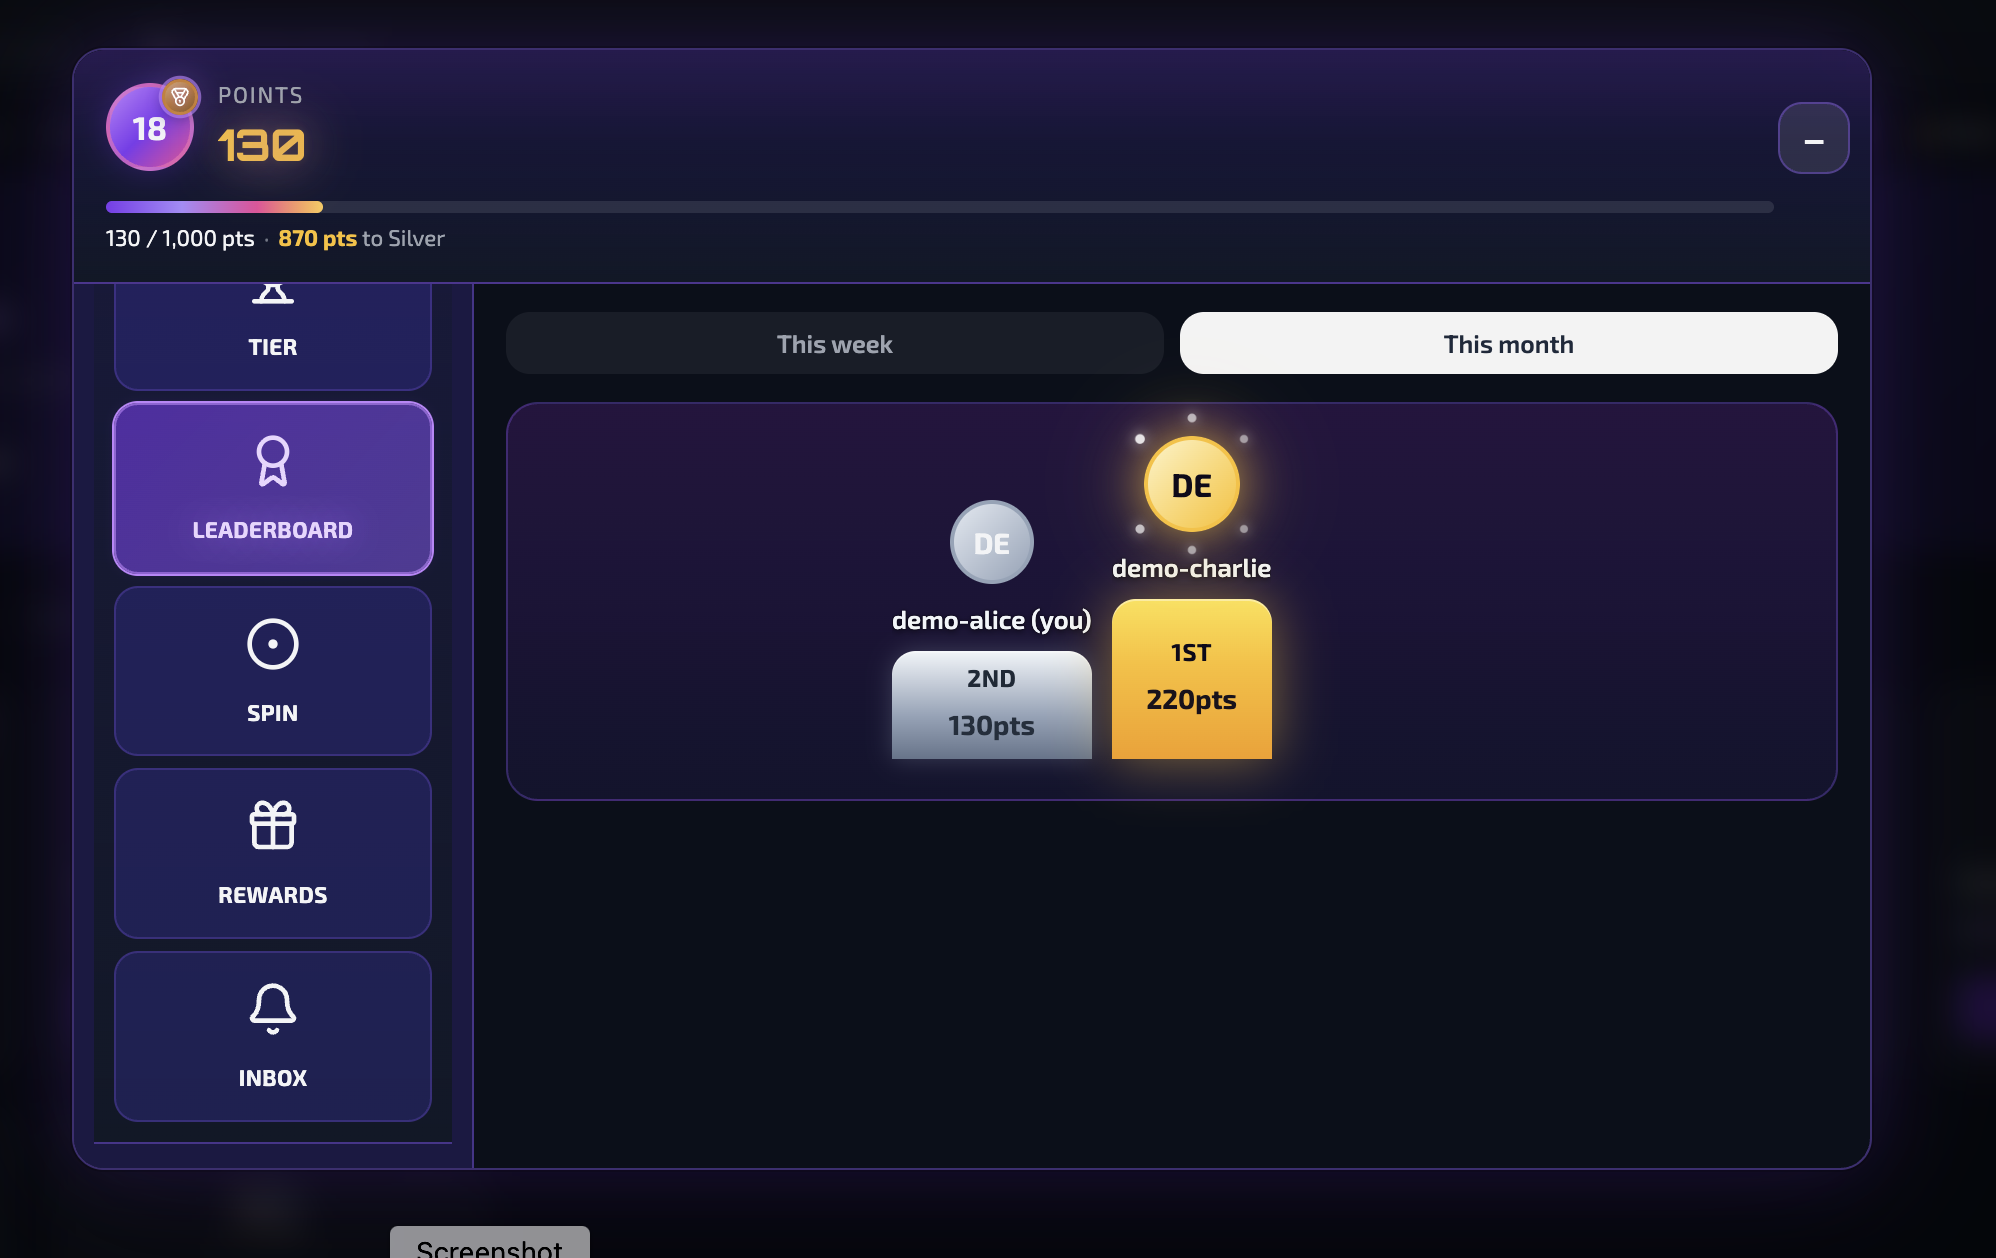
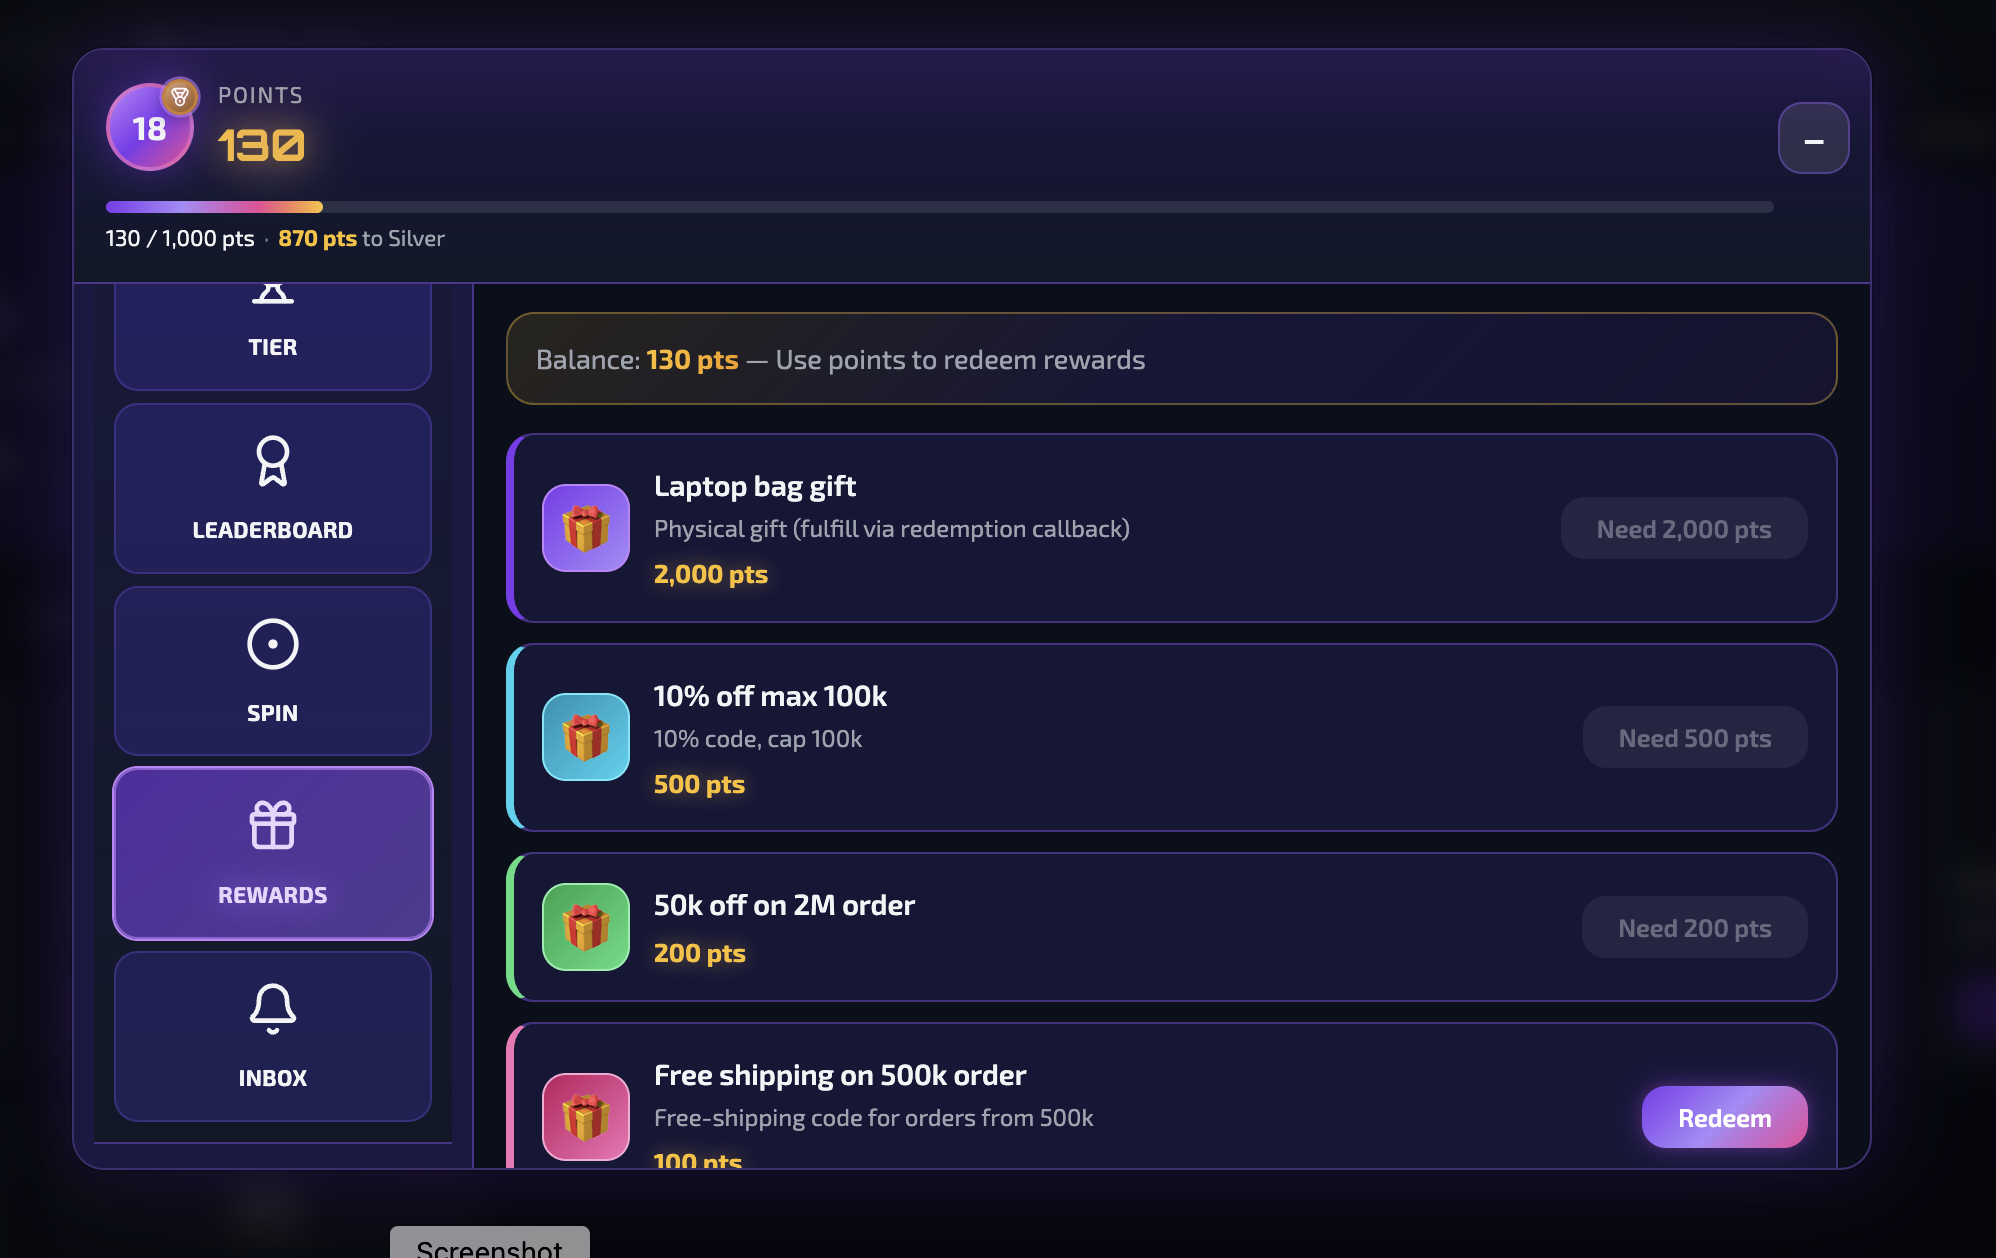
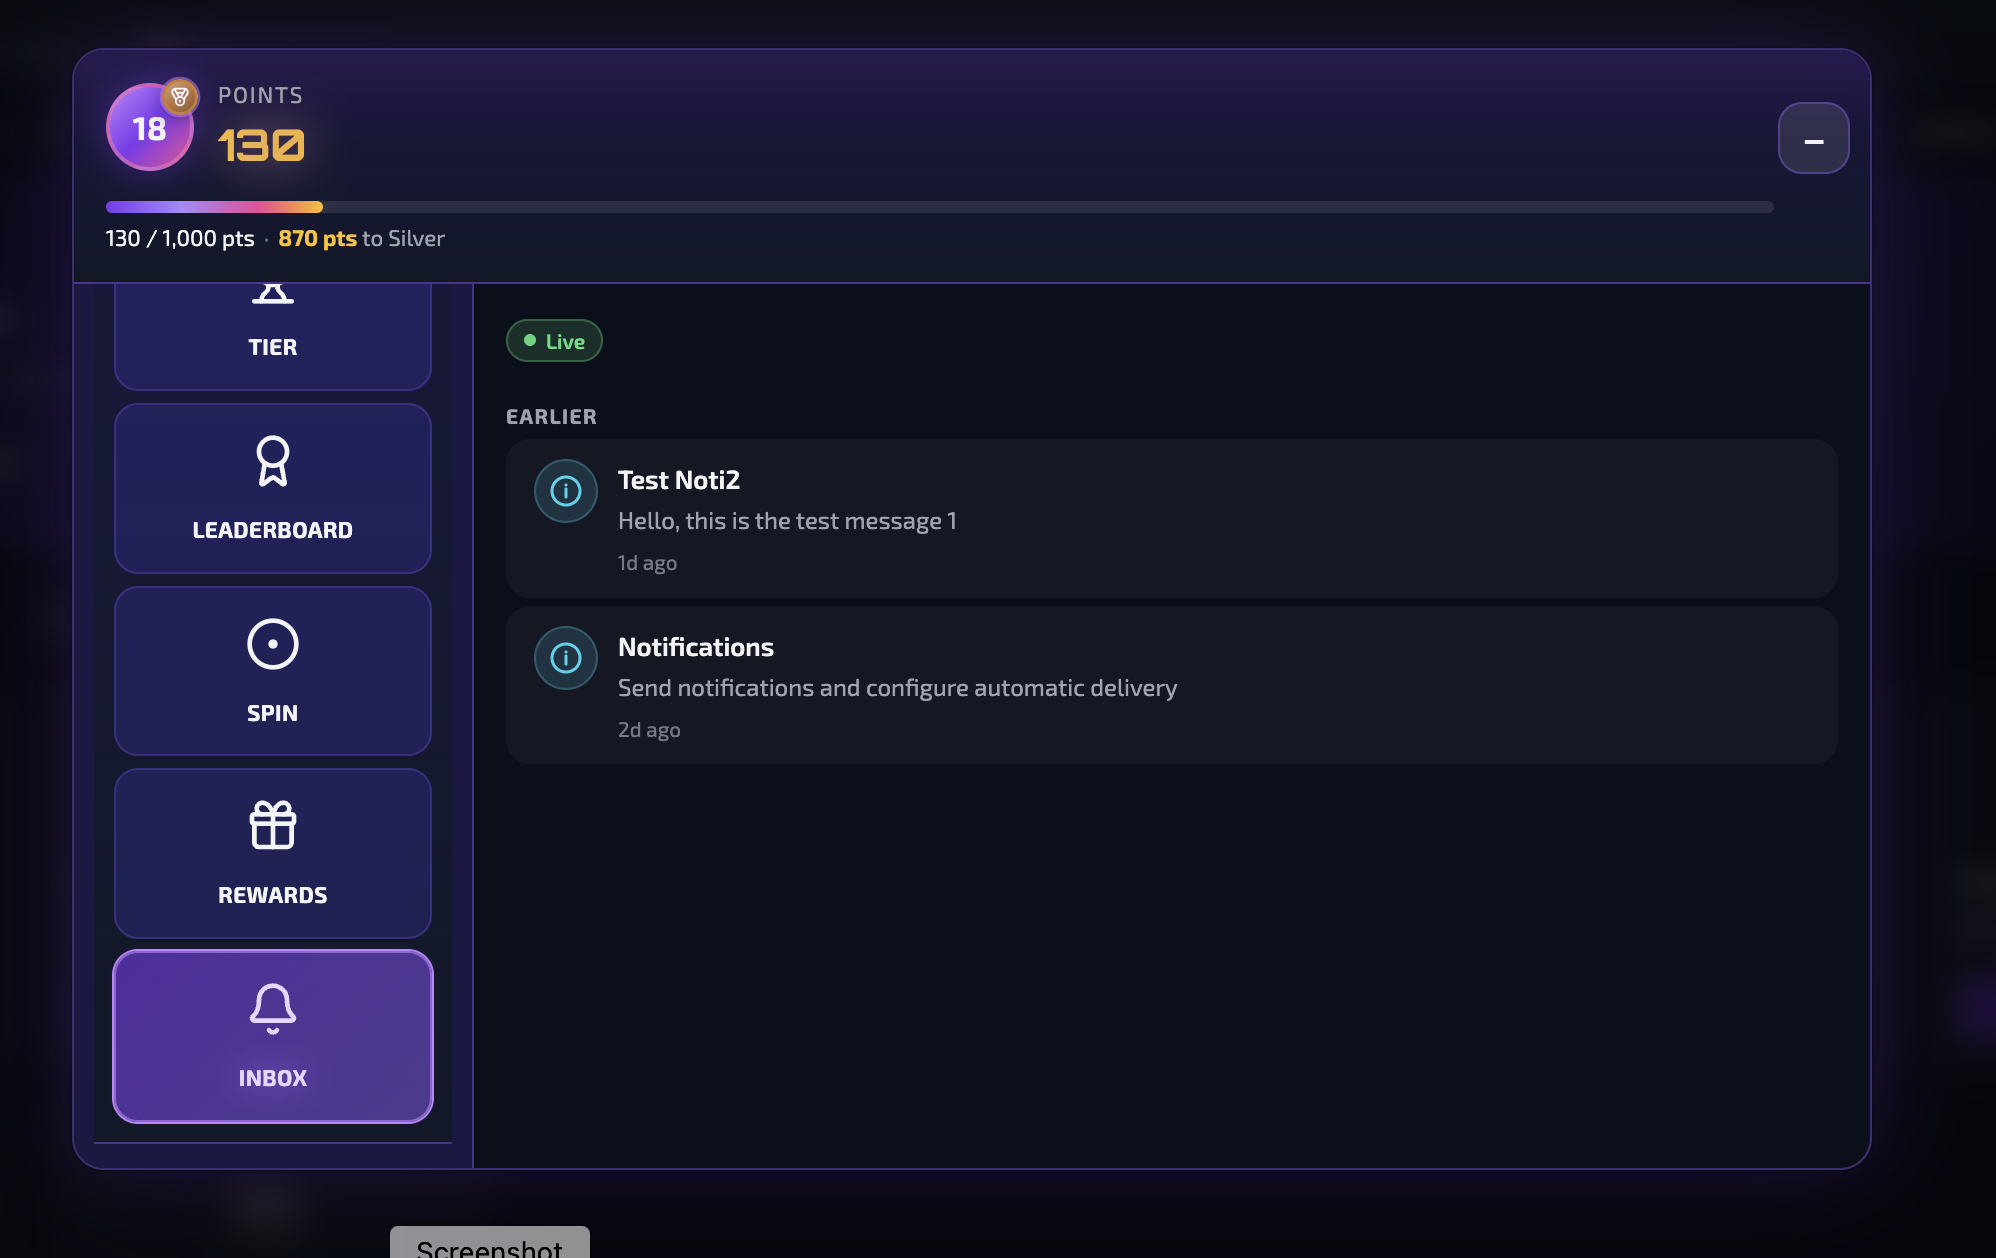
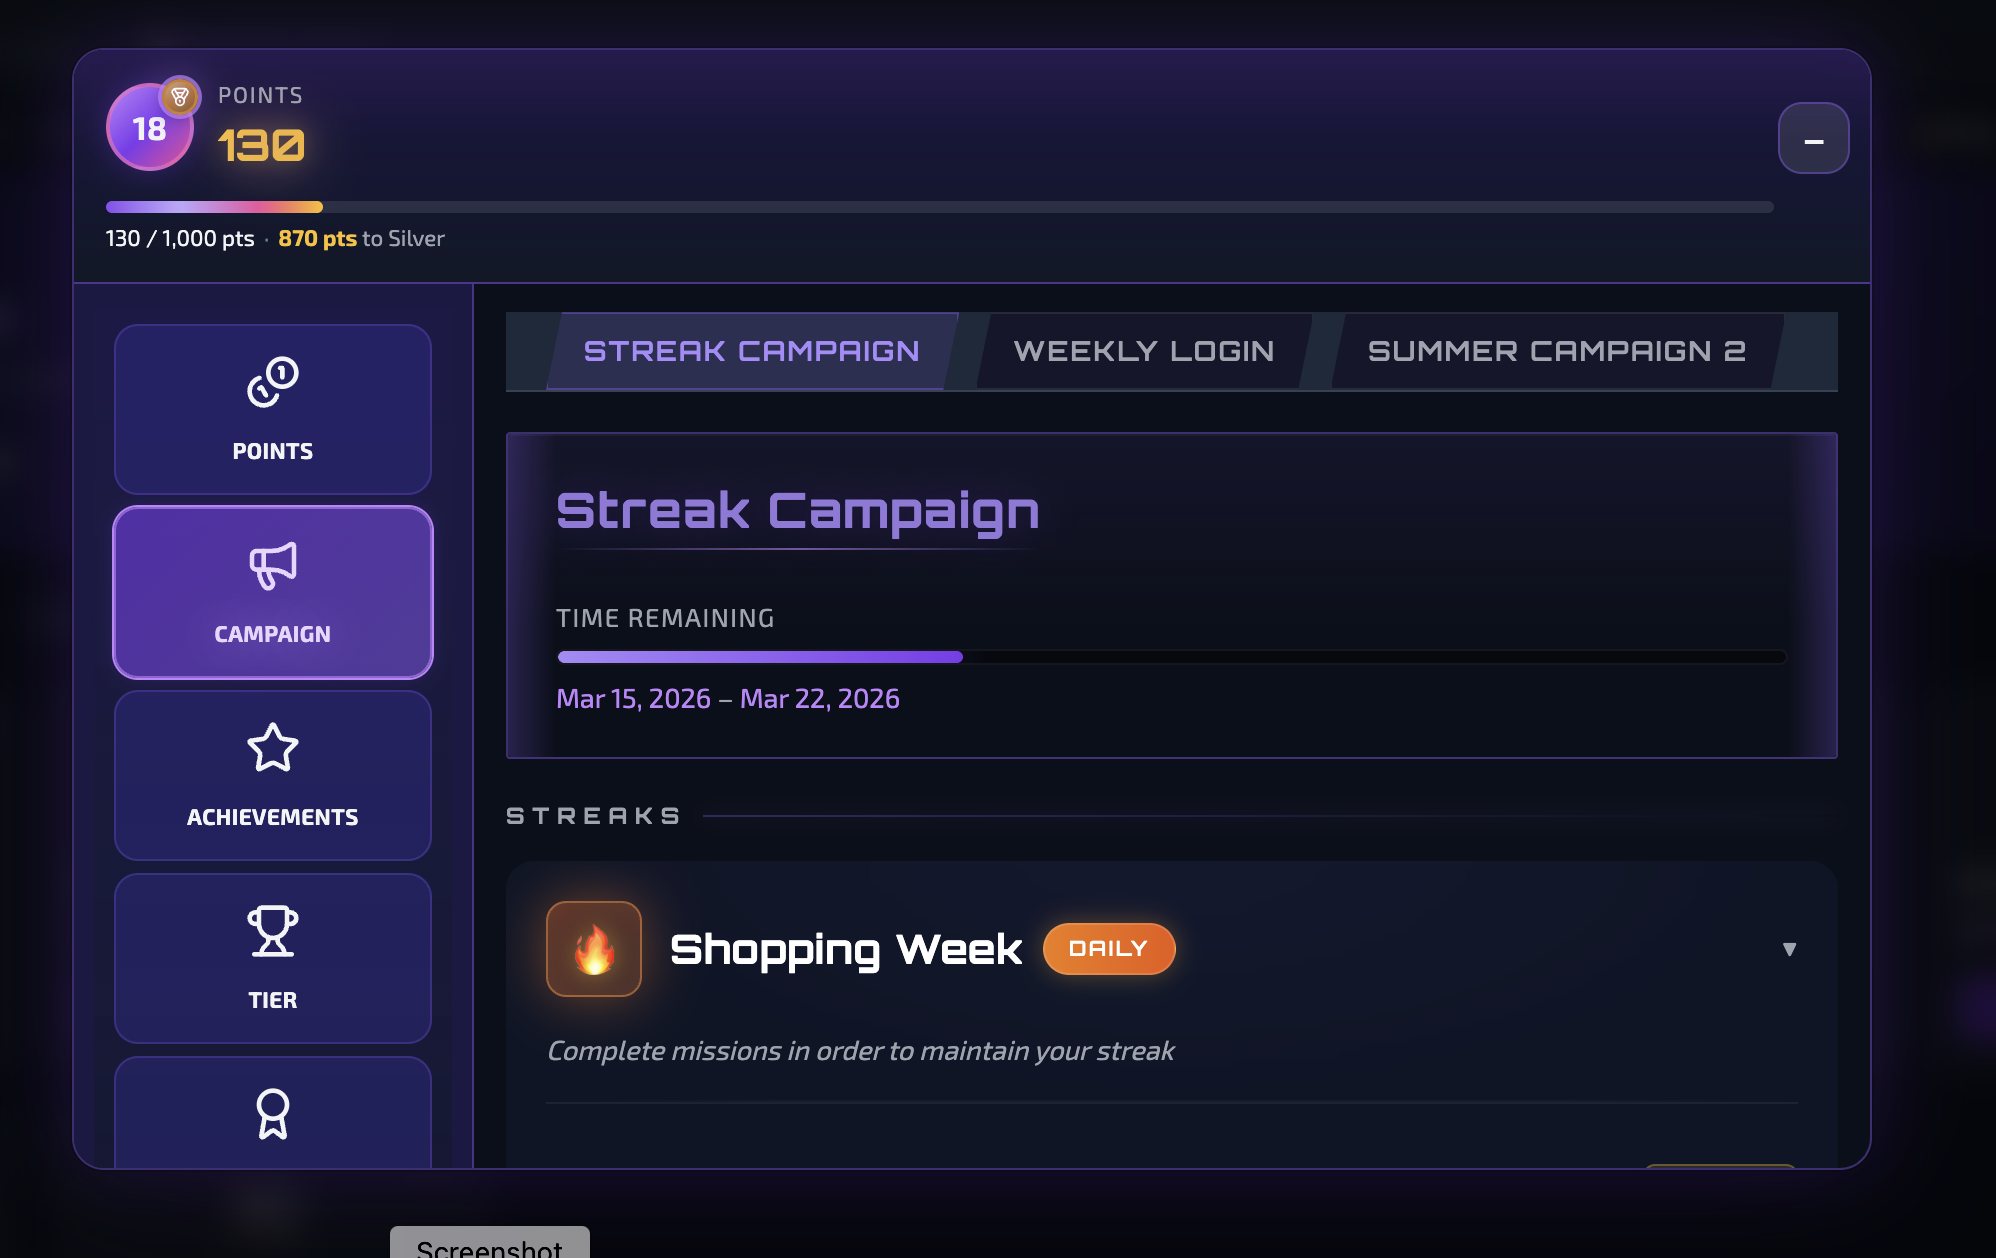
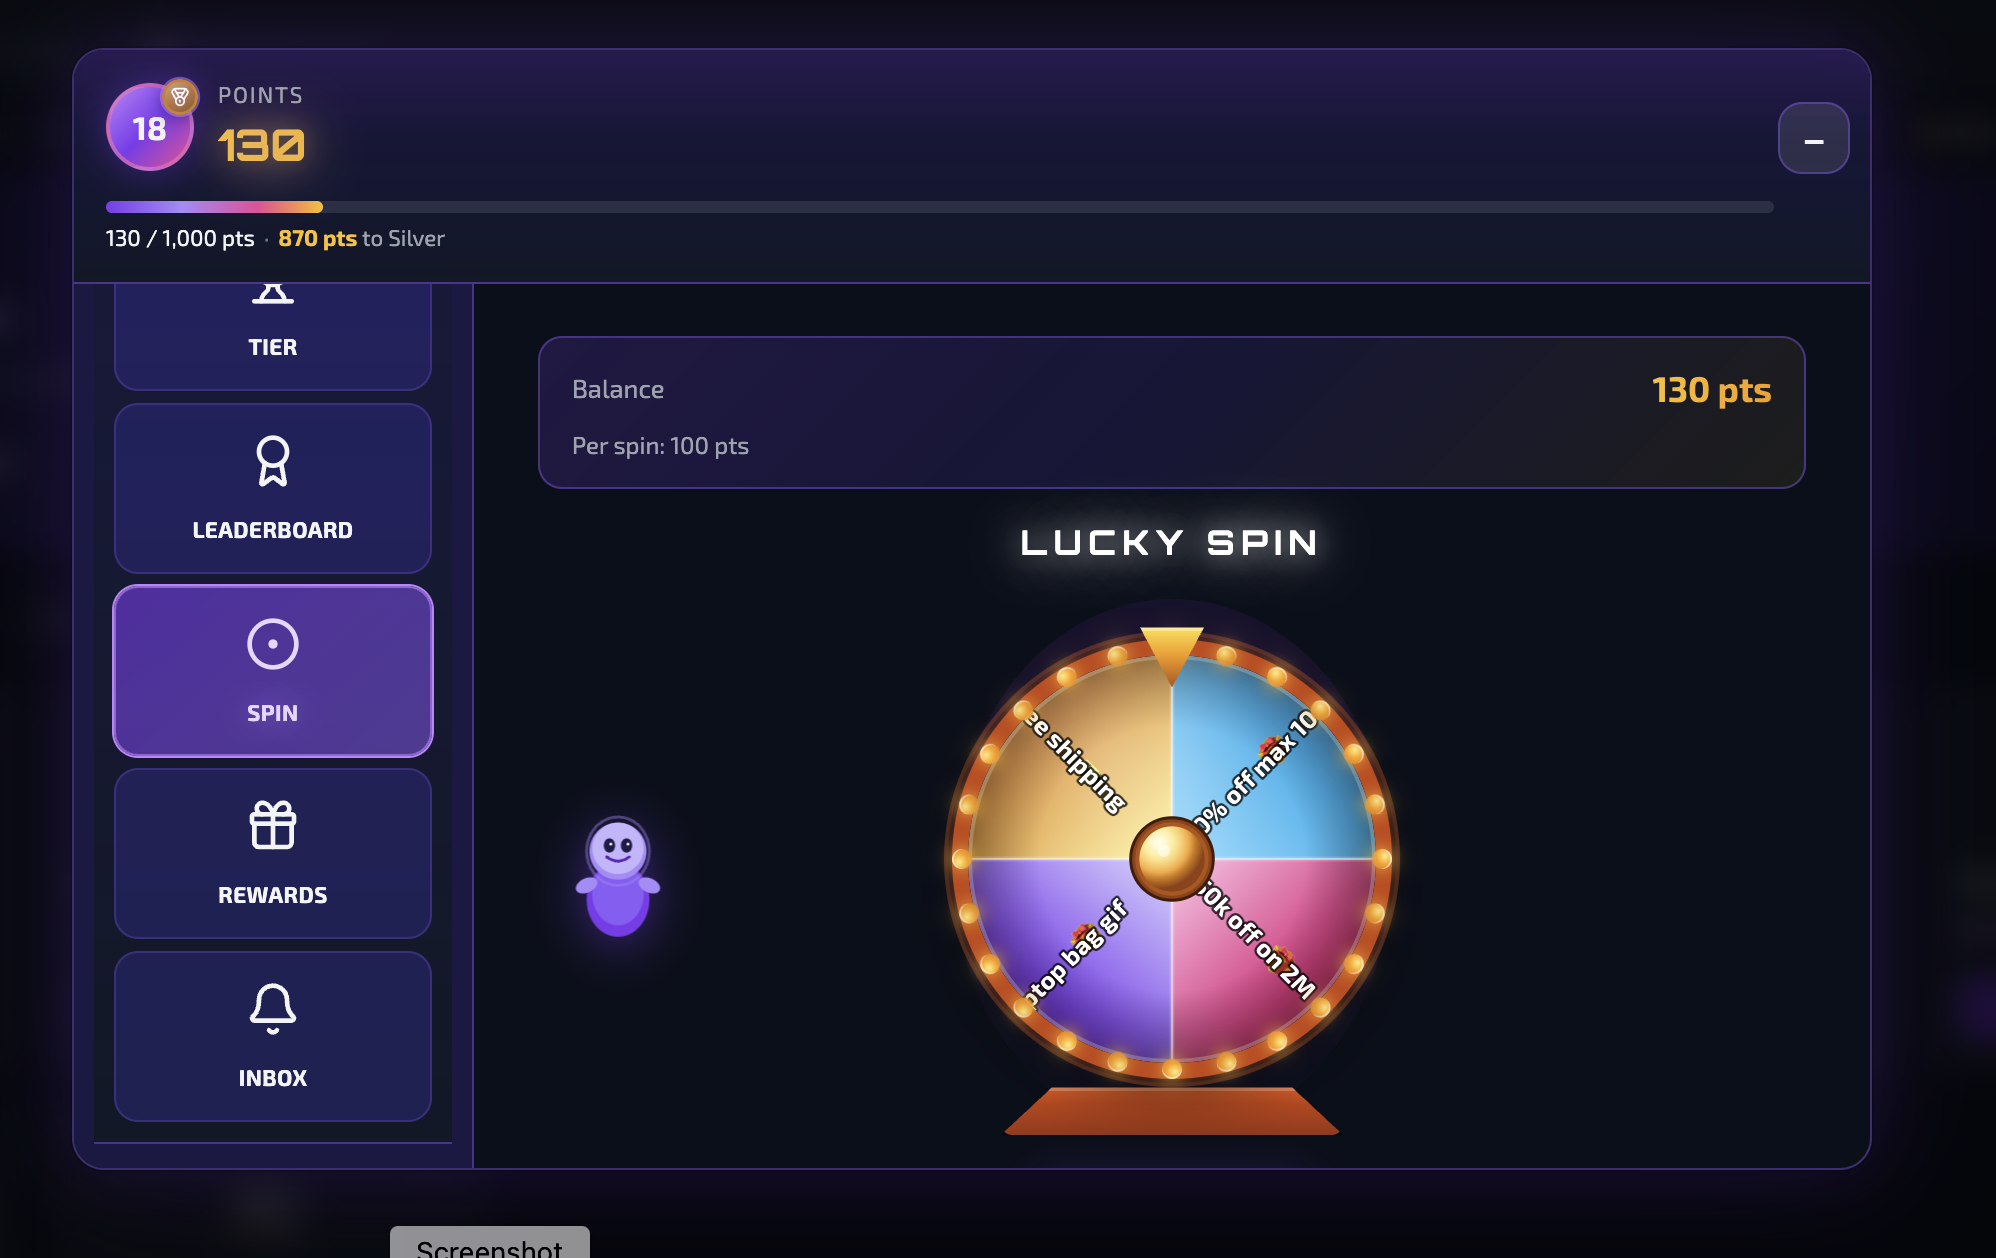
Giao diện Widget
Bấm vào ảnh để xem phóng to

Token verification — Bật để tích hợp Widget (chế độ Token)
Khi dùng Widget không muốn lộ API Key trên trình duyệt (ví dụ user đăng nhập bằng session/JWT của bạn), cần bật Token verification và cấu hình đúng. Đây là chế độ bắt buộc để “cắm” Widget vào site của bạn theo cách an toàn.
Token verify là gì, tại sao cần
Token verification nghĩa là: Widget trên trình duyệt gửi token do hệ thống của bạn cấp (session id, JWT, …) trong mỗi request lên GamifyEngine qua header X-User-Token. Backend GamifyEngine không lưu API Key cho từng user; thay vào đó sẽ gọi sang URL verify của bạn (do bạn cấu hình trong Client Admin), gửi token đó. Backend của bạn kiểm tra token hợp lệ và trả về external_id (id user trong hệ thống bạn). Engine dùng external_id để tìm/tạo user trong Gamify và xử lý request widget. Nhờ vậy:
- API Key không xuất hiện trên frontend → bảo mật hơn.
- User được xác thực bởi hệ thống của bạn (session/JWT do bạn quản lý).
- Widget chỉ cần cung cấp hàm
getUserToken()trả token hiện tại (vd. lấy từ localStorage/session sau login).
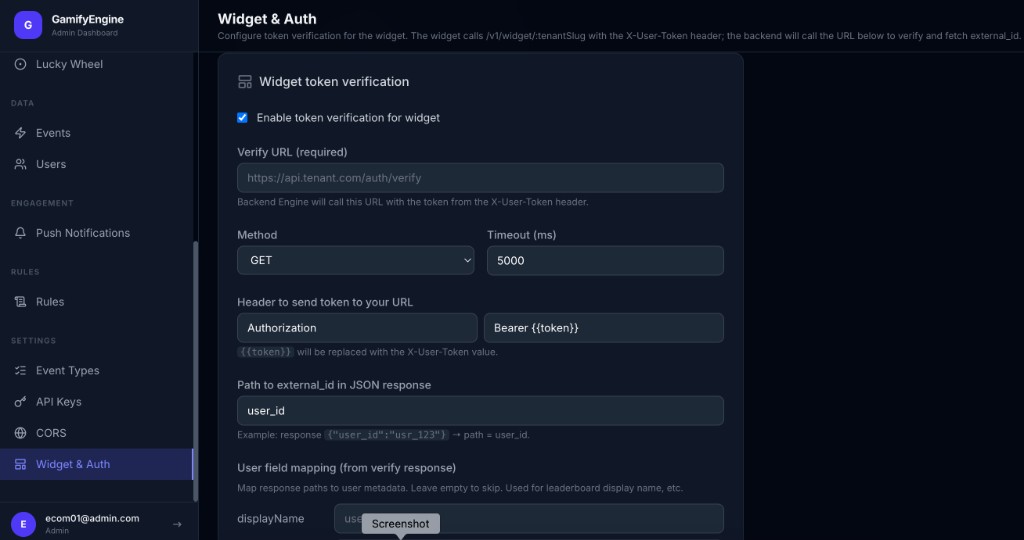
Cần bật Token verification trong Client Admin (Settings → Widget & Auth) và cấu hình Verify URL, method, header gửi token, path đến external_id trong response. Nếu không bật hoặc config sai, Widget chế độ token sẽ nhận lỗi (401, TENANT_VERIFICATION_NOT_CONFIGURED, TOKEN_VERIFICATION_FAILED).
Cách tích hợp (tóm tắt)
- Client Admin: Vào Settings → Widget & Auth → bật “Enable token verification for widget” → điền Verify URL (backend của bạn, vd.
https://api.tenant.com/auth/verify), Method (GET/POST), header gửi token (vd.Authorization: Bearer {{token}}), Timeout, Path to external_id in JSON response (vd.user_idnếu response là{"user_id":"usr_123"}). Lưu thay đổi. - Backend của bạn: Implement endpoint verify: nhận request với token (trong header theo config), xác thực token (session/JWT), trả JSON chứa field
external_id(hoặc field bạn đã khai báo trong “Path to external_id”, vd.user_id). Trả 4xx/5xx nếu token không hợp lệ. - Frontend (client): Sau khi user đăng nhập, lưu token (localStorage, sessionStorage, hoặc biến trong memory). Khi mount Widget, truyền
apiBaseUrl,tenantSlugvàgetUserToken(function trả token hiện tại). Widget sẽ gửi token trong headerX-User-Tokenkhi gọi API.
Cấu hình Widget & Auth — Token verification trong Client Admin.
Sơ đồ luồng: Client → Gamify → Backend của client (verify)
Luồng gọi khi Widget dùng chế độ token:
sequenceDiagram
  participant C as 1. Client (Browser)
getUserToken()
  participant G as 2. GamifyEngine
/v1/widget/:tenantSlug
  participant B as 3. Backend của bạn
(Verify URL)
  C->>G: ① Request + X-User-Token
  G->>B: ② Gọi Verify URL + token
  B->>G: ③ 200 + JSON (external_id)
  Note over G: ④ Identify user, lấy dữ liệu Widget
  G->>C: ⑤ Trả dữ liệu Widget
Luồng: Widget gửi token → Engine gọi Verify URL của bạn → Backend trả external_id → Engine Identify user → trả dữ liệu về Client.
Code mẫu phía client (lưu token, lấy token, mount Widget)
Sau khi user đăng nhập, lưu token (vd. JWT hoặc session id) vào localStorage, sessionStorage, hoặc state. Cung cấp hàm getUserToken() cho Widget; Widget gọi hàm này mỗi khi cần gửi request và đưa giá trị vào header X-User-Token.
// ─── Sau khi login thành công (vd. từ API /auth/login) ───
var token = response.accessToken;  // hoặc response.sessionId, ...
localStorage.setItem('my_app_token', token);

// ─── Hàm lấy token cho Widget (có thể trả Promise) ───
function getUserToken() {
  return localStorage.getItem('my_app_token') || null;
}

// ─── Mount Widget chế độ Token (không dùng apiKey) ───
GamifyWidget.mount({
  apiBaseUrl:  'https://api.gamifyengine.com',
  tenantSlug:  'my-tenant',
  getUserToken: getUserToken,
  theme:       'cyberpunk',
  fabPosition: 'right-bottom',
  container:   '#gamify-widget-root',
});

// Logout: xóa token và có thể unmount widget
// localStorage.removeItem('my_app_token');
Nếu token nằm trong cookie (HttpOnly) thì frontend không đọc được; khi đó cần backend của bạn cung cấp endpoint trả token/session cho trang (vd. qua API riêng) hoặc dùng proxy. Trường hợp token trong memory/state (React): truyền getUserToken: () => authState.token.
Chế độ Token không truyền apiKey hay externalId. Chỉ cần apiBaseUrl, tenantSlug và getUserToken. Verify URL trong Client Admin phải trỏ tới backend của bạn và backend phải trả JSON có field chứa external_id (theo path đã cấu hình).
CDN: https://gamify-widget.pages.dev/gamify-widget.umd.js và gamify-widget.css.
GamifyWidget.mount({
  apiBaseUrl: 'https://api.gamifyengine.com',
  apiKey: 'YOUR_API_KEY',
  externalId: 'USER_ID_CLIENT',
  container: '#gamify-widget-root'
});
Bước nhúng nhanh
- Thêm thẻ
<div id="gamify-widget-root"></div>vào trang (ví dụ sau khi user đăng nhập). - Load React 18 (production) và file widget từ CDN:
gamify-widget.umd.js,gamify-widget.css. - Gọi
GamifyWidget.mount({ apiBaseUrl, apiKey, externalId, container: '#gamify-widget-root' }).externalIdlà id user trên hệ thống của bạn; widget sẽ tự gọi Identify để lấy hoặc tạo user.
Code demo tích hợp (step-by-step)
Làm theo từng bước dưới đây (hoặc copy đoạn code) để nhúng Widget giống demo-app. Sau khi có apiBaseUrl, apiKey và externalId (id user của bạn), chỉ cần 2 bước: load script → gọi mount.
Bước 1 — Chuẩn bị trang HTML (load script)
Trong <head> hoặc trước </body>: thêm polyfill cho widget, CSS widget, React 18, rồi script UMD. Widget báo sẵn sàng qua event gamify:ready.
<!-- Polyfill cho widget (production) -->
<script>globalThis.process = { env: { NODE_ENV: 'production' } };</script>
<link rel="stylesheet" href="https://gamify-widget.pages.dev/gamify-widget.css" />
<script crossorigin src="https://unpkg.com/react@18/umd/react.production.min.js"></script>
<script crossorigin src="https://unpkg.com/react-dom@18/umd/react-dom.production.min.js"></script>
<script
  src="https://gamify-widget.pages.dev/gamify-widget.umd.js"
  onload="(function(){
    var gw = globalThis.GamifyWidget;
    if (gw && typeof gw.mount !== 'function' && gw.default && typeof gw.default.mount === 'function') {
      globalThis.GamifyWidget = gw.default;
    }
    globalThis.dispatchEvent(new Event('gamify:ready'));
  })()"
></script>
Bước 2 — Gọi mount khi script đã load
Cách A — Trang HTML thuần: khi DOM sẵn sàng, đợi gamify:ready (hoặc kiểm tra GamifyWidget đã có), rồi gọi GamifyWidget.mount(...). Không truyền container thì widget tự render dạng floating (icon góc màn hình + modal).
<script>
(function() {
  var apiBaseUrl = 'https://api.gamifyengine.com';  // thay bằng URL thật
  var apiKey     = 'YOUR_API_KEY';                   // nên lấy từ backend/session
  var externalId = 'user-123';                       // id user trên hệ thống của bạn

  function doMount() {
    globalThis.GamifyWidget.mount({
      apiBaseUrl:  apiBaseUrl,
      apiKey:     apiKey,
      externalId:  externalId,
      theme:      'cyberpunk',
      fabPosition: 'right-bottom',
    });
  }

  if (globalThis.GamifyWidget && typeof globalThis.GamifyWidget.mount === 'function') {
    doMount();
  } else {
    globalThis.addEventListener('gamify:ready', doMount, { once: true });
  }
})();
</script>
Cách B — Trong React (như demo-app): trong component có config (apiBaseUrl, apiKey) và user (id), dùng useEffect để mount khi user/config thay đổi; cleanup gọi instance.unmount().
useEffect(function() {
  if (!config || !user) return;
  var instance = null;

  function doMount() {
    instance = globalThis.GamifyWidget.mount({
      apiBaseUrl:  config.gamifyApiUrl,
      apiKey:     config.gamifyApiKey,
      externalId:  user.id,
      tenant:      config.gamifyTenant || undefined,
      theme:      'cyberpunk',
      fabPosition: 'right-bottom',
      showToasts:  true,
    });
  }

  if (globalThis.GamifyWidget) {
    doMount();
  } else {
    globalThis.addEventListener('gamify:ready', doMount, { once: true });
  }

  return function cleanup() {
    globalThis.removeEventListener('gamify:ready', doMount);
    if (instance && typeof instance.unmount === 'function') instance.unmount();
  };
}, [user?.id, config?.gamifyApiUrl, config?.gamifyApiKey, config?.gamifyTenant]);
Bước 3 — Kiểm tra
Mở trang → đăng nhập (hoặc set externalId đúng) → xuất hiện icon widget góc phải dưới → bấm mở modal xem điểm, tier, đổi thưởng. Có thể tải demo-app.zip để chạy full app (React + Node backend) và xem tab "Widget Demo".
Tham số mount
apiBaseUrl (bắt buộc), apiKey hoặc tenantSlug+getUserToken (chế độ token), externalId hoặc userId, container (selector). Tuỳ chọn: metadata (displayName, ...), fabPosition (vd. right-bottom).
Không hardcode API Key trên frontend; nên do backend trả về theo session.
Embeddable widget for end-users: view points, tier, achievements, redeem rewards. Floating icon + modal; embed in your website.
Value for partners (use case)
Your users see points, tier, missions, and rewards directly on your site or app — one floating icon, click to open a full modal. You don’t need to design or build the UI; add a few lines of code and you get a complete gamification experience. Ideal when you want end-users to view points and redeem without leaving your product.
Step-by-step integration (for developers)
- Get apiBaseUrl and apiKey
From Client Admin → API Keys (or from your backend per session). Do not hardcode the API Key on the frontend.
- Add div and load script from CDN
On your page (after user login): add
<div id="gamify-widget-root"></div>. Load React 18 +gamify-widget.umd.jsandgamify-widget.cssfrom CDN (see below). - Call GamifyWidget.mount(...)
Pass
apiBaseUrl,apiKey,externalId(your system’s user id),container: '#gamify-widget-root'. The widget calls Identify automatically — no prior API call needed. Done; users see points and can redeem.
Two modes:
- API Key: Pass
apiBaseUrl,apiKey,externalId(oruserId). Widget calls API with Bearer + X-User-Id. Prefer loading apiKey from backend/session. - Token (Verify URL): Pass
tenantSlug+getUserToken(). Widget sends X-User-Token; Engine backend calls tenant verify URL to get external_id.
Widget UI
Click an image to view full size
Token verification — Enable to integrate Widget (Token mode)
When using the Widget without exposing the API Key in the browser (e.g. users log in with your session/JWT), you must enable Token verification and configure it correctly. This is the required mode to embed the Widget on your site securely.
What token verify is and why it’s needed
Token verification means: the Widget in the browser sends a token issued by your system (session id, JWT, etc.) in every request to GamifyEngine via the X-User-Token header. The GamifyEngine backend does not store an API Key per user; instead it calls your verify URL (configured in Client Admin), sending that token. Your backend validates the token and returns external_id (the user id in your system). The Engine uses external_id to find or create the user in Gamify and serve the widget request. As a result:
- The API Key never appears on the frontend — more secure.
- Users are authenticated by your system (session/JWT you control).
- The Widget only needs a
getUserToken()function that returns the current token (e.g. from localStorage/session after login).
You must enable Token verification in Client Admin (Settings → Widget & Auth) and set the Verify URL, method, header to send the token, and the path to external_id in the response. If disabled or misconfigured, the Widget in token mode will get errors (401, TENANT_VERIFICATION_NOT_CONFIGURED, TOKEN_VERIFICATION_FAILED).
How to integrate (summary)
- Client Admin: Go to Settings → Widget & Auth → enable “Enable token verification for widget” → set Verify URL (your backend, e.g.
https://api.tenant.com/auth/verify), Method (GET/POST), header to send token (e.g.Authorization: Bearer {{token}}), Timeout, and Path to external_id in JSON response (e.g.user_idif response is{"user_id":"usr_123"}). Save. - Your backend: Implement the verify endpoint: receive the request with the token (in the header per config), validate the token (session/JWT), return JSON with the field that contains
external_id(or the field you set in “Path to external_id”, e.g.user_id). Return 4xx/5xx if the token is invalid. - Frontend (client): After login, store the token (localStorage, sessionStorage, or in-memory). When mounting the Widget, pass
apiBaseUrl,tenantSlug, andgetUserToken(function that returns the current token). The Widget will send this token in theX-User-Tokenheader on each API call.
Widget & Auth — Token verification in Client Admin.
Flow: Client → Gamify → Your backend (verify)
When the Widget uses token mode, the flow is:
sequenceDiagram
  participant C as 1. Client (Browser)
getUserToken()
  participant G as 2. GamifyEngine
/v1/widget/:tenantSlug
  participant B as 3. Your backend
(Verify URL)
  C->>G: ① Request + X-User-Token
  G->>B: ② Call Verify URL + token
  B->>G: ③ 200 + JSON (external_id)
  Note over G: ④ Identify user, fetch Widget data
  G->>C: ⑤ Return Widget data
Flow: Widget sends token → Engine calls your Verify URL → Backend returns external_id → Engine Identifies user → returns data to Client.
Sample client code (store token, get token, mount Widget)
After the user logs in, store the token (e.g. JWT or session id) in localStorage, sessionStorage, or app state. Provide a getUserToken() function to the Widget; the Widget calls it when it needs to send a request and puts the value in the X-User-Token header.
// ─── After successful login (e.g. from API /auth/login) ───
var token = response.accessToken;  // or response.sessionId, ...
localStorage.setItem('my_app_token', token);

// ─── Function to get token for Widget (can return Promise) ───
function getUserToken() {
  return localStorage.getItem('my_app_token') || null;
}

// ─── Mount Widget in Token mode (no apiKey) ───
GamifyWidget.mount({
  apiBaseUrl:  'https://api.gamifyengine.com',
  tenantSlug:  'my-tenant',
  getUserToken: getUserToken,
  theme:       'cyberpunk',
  fabPosition: 'right-bottom',
  container:   '#gamify-widget-root',
});

// On logout: clear token and optionally unmount widget
// localStorage.removeItem('my_app_token');
If the token is in an HttpOnly cookie, the frontend cannot read it; your backend must then expose an endpoint that returns the token/session for the page, or use a proxy. For token in memory/state (e.g. React): pass getUserToken: () => authState.token.
In Token mode do not pass apiKey or externalId. Only apiBaseUrl, tenantSlug, and getUserToken are needed. The Verify URL in Client Admin must point to your backend, and your backend must return JSON with the field that contains external_id (according to the path you configured).
CDN: https://gamify-widget.pages.dev/gamify-widget.umd.js and gamify-widget.css.
GamifyWidget.mount({
  apiBaseUrl: 'https://api.gamifyengine.com',
  apiKey: 'YOUR_API_KEY',
  externalId: 'USER_ID_CLIENT',
  container: '#gamify-widget-root'
});
Quick embed steps
- Add
<div id="gamify-widget-root"></div>to your page (e.g. after user login). - Load React 18 (production) and widget files from CDN:
gamify-widget.umd.js,gamify-widget.css. - Call
GamifyWidget.mount({ apiBaseUrl, apiKey, externalId, container: '#gamify-widget-root' }).externalIdis your system’s user id; the widget will call Identify to get or create the user.
Step-by-step demo code
Follow the steps below (or copy the code blocks) to embed the Widget the same way as the demo-app. Once you have apiBaseUrl, apiKey, and externalId (your user id), you only need two steps: load the script → call mount.
Step 1 — Prepare HTML (load scripts)
In <head> or before </body>: add the widget polyfill, widget CSS, React 18, then the UMD script. The widget signals readiness via the gamify:ready event.
<!-- Widget polyfill (production) -->
<script>globalThis.process = { env: { NODE_ENV: 'production' } };</script>
<link rel="stylesheet" href="https://gamify-widget.pages.dev/gamify-widget.css" />
<script crossorigin src="https://unpkg.com/react@18/umd/react.production.min.js"></script>
<script crossorigin src="https://unpkg.com/react-dom@18/umd/react-dom.production.min.js"></script>
<script
  src="https://gamify-widget.pages.dev/gamify-widget.umd.js"
  onload="(function(){
    var gw = globalThis.GamifyWidget;
    if (gw && typeof gw.mount !== 'function' && gw.default && typeof gw.default.mount === 'function') {
      globalThis.GamifyWidget = gw.default;
    }
    globalThis.dispatchEvent(new Event('gamify:ready'));
  })()"
></script>
Step 2 — Call mount when script is loaded
Option A — Vanilla HTML: when the DOM is ready, wait for gamify:ready (or check that GamifyWidget exists), then call GamifyWidget.mount(...). If you omit container, the widget renders as a floating icon + modal.
<script>
(function() {
  var apiBaseUrl = 'https://api.gamifyengine.com';
  var apiKey     = 'YOUR_API_KEY';
  var externalId = 'user-123';

  function doMount() {
    globalThis.GamifyWidget.mount({
      apiBaseUrl:  apiBaseUrl,
      apiKey:     apiKey,
      externalId:  externalId,
      theme:      'cyberpunk',
      fabPosition: 'right-bottom',
    });
  }

  if (globalThis.GamifyWidget && typeof globalThis.GamifyWidget.mount === 'function') {
    doMount();
  } else {
    globalThis.addEventListener('gamify:ready', doMount, { once: true });
  }
})();
</script>
Option B — Inside React (as in demo-app): in a component that has config (apiBaseUrl, apiKey) and user (id), use useEffect to mount when user/config change; in cleanup call instance.unmount().
useEffect(function() {
  if (!config || !user) return;
  var instance = null;

  function doMount() {
    instance = globalThis.GamifyWidget.mount({
      apiBaseUrl:  config.gamifyApiUrl,
      apiKey:     config.gamifyApiKey,
      externalId:  user.id,
      tenant:      config.gamifyTenant || undefined,
      theme:      'cyberpunk',
      fabPosition: 'right-bottom',
      showToasts:  true,
    });
  }

  if (globalThis.GamifyWidget) {
    doMount();
  } else {
    globalThis.addEventListener('gamify:ready', doMount, { once: true });
  }

  return function cleanup() {
    globalThis.removeEventListener('gamify:ready', doMount);
    if (instance && typeof instance.unmount === 'function') instance.unmount();
  };
}, [user?.id, config?.gamifyApiUrl, config?.gamifyApiKey, config?.gamifyTenant]);
Step 3 — Verify
Open the page → log in (or set externalId correctly) → the widget icon appears at bottom-right → click to open the modal (points, tier, rewards). You can download demo-app.zip to run the full app (React + Node backend) and use the "Widget Demo" tab.
Mount parameters
apiBaseUrl (required), apiKey or tenantSlug+getUserToken (token mode), externalId or userId, container (selector). Optional: metadata (displayName, ...), fabPosition (e.g. right-bottom).
Do not hardcode API Key on the frontend; have the backend return it per session.